
Need this implemented on your site? Click here and fill out our quote form!
Hello!
There are many reasons why your Woocommerce store may need a system to accommodate verifying the identity of your customers. Depending on what your selling and the local or federal laws that are in place, having the identity of your consumer verified may be needed for liability or compliance reasons. Additionally under certain conditions within your Woocommerce store (such as orders over a certain amount of money), validating the identity can dramatically reduce the risk of fraud and fraudulent transactions on your site.
I’m going to go into details with how to implement a system into your Woocommerce store that will accommodate the following :
- Provide a section within the Woocommerce “my account” area for end-users to upload a digital image of their ID
- Add a new field for the user details to allow administrators an easy “verified” or “not verified” flag
- Add a new column to all orders to identify if the ordering user is already verified or not
- Add a checking mechanism during the checkout process to display a warning notification if the user is not verified, with instructions on how to upload their ID in the “my account” area
- Add a cookie based security mechanism and details on how to protect the digital ID image files from being directly accessed publicly
Since there’s quite a lot to cover here, I’ll break the above list into their own sections with details and explanations for each.
Create a new section in Woocommerce’s My Account area for end users to upload their ID
This task can be divided into two parts, though the second part is just creating the user file upload field in Advanced Custom Field.
In Woocommerce, for end users that have created an account, there is typically an out-of-the-box “My Account” area where they can view previous orders, update their billing/shipping address and change their profile values.
Creating a new section here is relatively easy and can be done by editing your theme’s functions.php file. Woocommerce provides several hooks to easily inject the new section and insert content within the section. Unfortunately this is not as easy as just creating a WordPress page, but straightforward nontheless.
Add a new menu item to the My Account Woocommerce user dashboard
To accomplish this you need to hook into woocommerce_account_menu_items. This simply injects the menu item , which will produce a 404 error until we finish the other steps :
function shift8_account_menu_items( $items ) {

        $items['idverify'] = __( 'Get ID Verified', 'idverify' );
            return $items;
}

add_filter( 'woocommerce_account_menu_items', 'shift8_account_menu_items', 10, 1 );
Add a new menu endpoint and inject content into the endpoint
In this part , we are adding an endpoint and then injecting content into the endpoint using the init and woocommerce_account_NAME_endpoont hooks :
function shift8_add_my_account_endpoint() {
        add_rewrite_endpoint( 'idverify', EP_PAGES );
}

add_action( 'init', 'shift8_add_my_account_endpoint' );

function shift8_idverify_endpoint_content() {
    $current_user = get_current_user_id();
    $user_verified = get_field('shift8_government_id_verified', 'user_' . $current_user);
    if ($user_verified && in_array('verified', $user_verified)) {
        echo 'You are already verified and no longer need to upload your ID';
    } else {
        acf_form_head();
        $form_options = array(
            'fields' => array(
                'shift8_attach_valid_government_id',
            ),
            'submit_value' => __("Save changes", 'acf'),
            'updated_message' => __("Government ID submitted. Please allow 1-2 business days for verification to be complete.", 'acf'),
            'post_id' => 'user_' . $current_user,
        );
        acf_form($form_options);
    }
}

add_action( 'woocommerce_account_idverify_endpoint', 'shift8_idverify_endpoint_content' );
You’ll notice in the second function that we are checking for the presence of a value in a custom field called shift8_government_id_verified. We haven’t created this field yet, but we will. This is just a checkbox for each user where an administrator can flag the user as “Verified”. Technically you should only need to check ID for a user once, so this will help fast track that user for future orders.
Add a new custom user field for administrators to flag a user as verified
This is dead simple, and we make it even easier by using Advanced Custom Fields. We want to create a simple checkbox when editing a user account as an administrator. When checked, that value will be used to verify a user as “ID Verified”. We will use this value to then create a new column in the order list page in Woocommerce to make a quick way for users to scan the orders and determine if the user is verified.
We want to add two fields : “Attach government ID” and “Government ID Verified”.
Use ACF to create a field for users to upload government ID
Instructions to create fields are already well documented. I will only clarify that you should probably create the field using “Location” rules, such as to show this field group if “User form” is equal to “Add / Edit”.
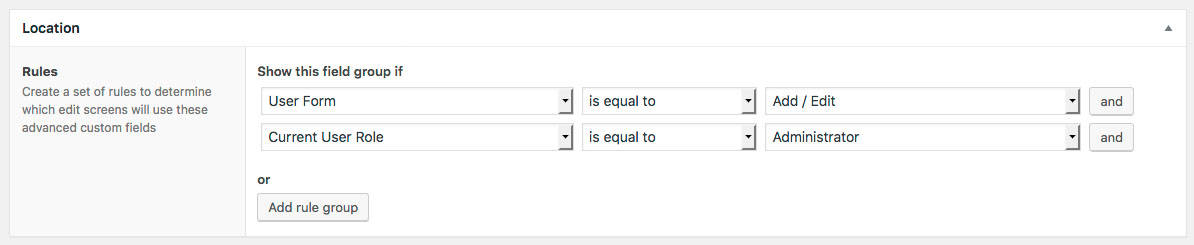
Use ACF to create a field for administrators to validate users as verified
This is a similar idea, but we only want administrators to see this field. So you create a checkbox field and under the location rules , show the field group if User form equals “add / edit” and more importantly if “Current user role” is equal to “Administrator” :
Add a custom column in Woocommerce orders to display custom field data
To add a new custom column we need to tap into 3 hooks, similar idea to how we had to add the Woocommerce my account menu item.
Add a custom column to Woocommerce orders for administrators
To add the column, you can simply paste this code :
function shift8_idverify_order_column( $columns ) {
    $columns['idverify_column'] = 'ID Verified';
    return $columns;
}
add_filter( 'manage_edit-shop_order_columns', 'shift8_idverify_order_column' );
Then we want to add a column header to be displayed at the top when viewing orders :
function shift8_add_idverify_column_header( $columns )  {

    $new_columns = array();

    foreach ( $columns as $column_name => $column_info ) {
        $new_columns[ $column_name ] = $column_info;
        if ( 'idverify_column' === $column_name ) {
            $new_columns['idverify_column'] = __( 'ID Verified', 'my-textdomain' );
        }
    }
    return $new_columns;
}
add_filter( 'manage_edit-shop_order_columns', 'shift8_add_idverify_column_header', 20 );
The next snippet is where the values for the associated user to the order are pulled. We take the order, find the user and then check the value of that custom checkbox field. We still haven’t created it yet, but I will detail that next.
function shift8_add_order_idverify_column_content( $column ) {
    global $post;
    if ( 'idverify_column' === $column ) {
        $order    = wc_get_order( $post->ID );
        $user_id = $order->user_id;
        $verified_status = get_field('shift8_government_id_verified', 'user_' . $user_id);
        if ($verified_status && in_array('verified', $verified_status)) {
            echo '';
        } else {
            echo ' Verify User';
        }
    }
}
add_action( 'manage_shop_order_posts_custom_column', 'shift8_add_order_idverify_column_content' );
Add mechanism to display a notice during checkout if the user is not verified
What do we have so far? Well we created 2 custom fields : one for the end user to upload government ID and one for admins to approve. Then we created a column to display the verify field for all orders listed. Then we created a custom area in the Woocommerce my account area.
Now we need to display a notice reminding users they need to upload ID during the checkout process. This is dead simple and can be used for other logic checks as well. We just want to check if the “Verified” flag is set, and if not we display a notice with a helpful reminder and perhaps a link directing them where to upload.
function shift8_add_notice_for_verified() {
    $current_user = get_current_user_id();
    $user_verified = get_field('shift8_government_id_verified', 'user_' . $current_user);
    if (!$user_verified && !in_array('verified', $user_verified)) {
        wc_add_notice( 'You need to upload government ID to your account to be verified. Your order may not be processed until this is done.', 'error' );
    }
}
add_action( 'woocommerce_before_checkout_form', 'shift8_add_notice_for_verified' );
We’re doing a check similar to how we did for the custom my account page to check that custom field. If its not verified, the wc_add_notice function is called.
Ensure digital ID files uploaded are protected
We’ve detailed how to protect your WordPress media files in a previous post so I would suggest reading up on that. Ideally what we want to do is take all files uploaded via the custom ACF field to go to a specific folder, not mixed in with other WordPress media files.
Then we want to create a mechanism to attach a session cookie if the end user is an administrator. We then want to modify our web service (Apache or Nginx) to check for the presence of this cookie when requests to the media folder URI are made. If the cookie isn’t present then redirect to the homepage. WordPress will handle forcing the assignment of this cookie with every request as an init function. This is a rudimentary way to protect the files.
Lastly, though I will not detail here, it is ideal to simply implement a cron scheduled task on your web server (if you are able) to clean out any files older than X days. You could take that a step further to create a WordPress script to check if a user is verified and then delete all files associated with that user in the media folder. That would be more immediate and effective, but either would work to ensure you are reducing the risk as much as possible for information leakage and un-authorized access of sensitive data like digital government ID files.