
* Update : Thank you Vice for writing an article about my script! Unfortunately it seems as though facebook is actually blocking the ability for anyone to share the article. I wonder why?
* Update 2 : Facebook is now allowing the Vice article to be shared, only after about 24 hours of blocking the ability.
Hello!
Through the course of web design and development, whether it be interacting with frameworks such as Laravel or WordPress, it is sometimes necessary to develop unit, load or stress tests with certain aspects of the user interface. A great set of tools to simulate real world interactions with websites in an automated way is the PhantomJS Webkit. PhantomJS is a “headless” (meaning no actual browser is required) kit that allows you to interact with elements of a rendered webpage.
This will allow you to simulate Ajax calls, form submissions and essentially everything that you can expect a real browser session to interact with. Taking PhantomJS one step further is CasperJS. CasperJS is a navigation scripting and testing utility on top of PhantomJS and SlimerJS.
One of the advantages of using these tools, aside from the unit and other testing highlighted above, is to implement the ability to automate actions on websites. There is obviously somewhat malicious uses for these kinds of tools in this context. However, today I will be highlighting how to properly purge your own personal data on Facebook. This post was inspired by the #DeleteFacebook movement. I’m not going into go too much into the movement itself or why it started. I am assuming that you have arrived here already being familiar with why one would even entertain these types of measures.
I would want to go into why a script like this is necessary first, before going into the code itself with more technical explanations.
Why purge your facebook data when you can just delete your account?
This is the first question I want to address. For anyone who has worked as a systems administrator, DevOps or developer for highly available enterprise environments you should know that data replication, geographic redundancy, backups, offsite backups and data retention policies are standard best practices that one would expect to find in these types of scenarios.
For Facebook, which accounts for about 40% of all referral traffic on the internet, you can only begin to imagine the replication, scaling, redundancy and other strategies that are employed across multiple geographically redundant data centers that Facebook operates.
What does this all mean?
This means that even by conservative assumptions, your data never really disappears permanently if you deactivate and delete your Facebook account. If your lucky enough to live in the European Union, then you might have better chances with the right to be forgotten. In North America, I dont see any reason to assume that your data is actually permanently deleted when you delete your account. It might even be safe to assume that this data is held and transparently linked to any new accounts you might open in the future, either by connecting phone numbers associated with accounts or by algorithmic statistical analysis.
How do you purge your facebook data before deleting your account?
Since we will never know the extent of data retention policies in the depths of Facebook’s proprietary engineering strategies, we can take the paranoid approach.
No strategy outlined here or anywhere else can purport to be 100% effective, however anyone with a good Systems Administration background can appreciate that the paranoid approach is the safest.
With that in mind, what we want to do is “poison” or obfuscate all our data such as timeline posts, likes, comments, and any other information that we have submitted to Facebook’s systems. What this means is that all these metrics that we have submitted to facebook (willingly) are part of what facebook uses to generate all the analytics and scary algorithmic calculations that determines things like who we voted for, sexual orientation and any number of things that we may have not willingly disclosed.
So we go back in time and obfuscate the data. All of it.
What I would propose, with the CasperJS script, is to automate the editing of all status updates on Facebook with random or pseudo random data (i.e. “spun” text that is readable but randomly generated). These status updates would need to be edited and re-saved multiple times over the course of an undisclosed amount of time.
We want to edit every post and replace it with random data (for the sake of argument) 5 times, over the course of 3 months. So if you had 1,000 posts in your facebook timeline, you would need to make 5,000 edits over the course of 90 days. Then we would want to have the data “sit” on Facebook’s systems to ensure that the re-saved data has poisoned even the historical backups as best as we possibly can.
This sounds extreme, but we want our replaced and obfuscated data to reach all of the Facebook endpoints in order to properly anonymize the data, ultimately taking back what we did not willingly give. That is to say, whatever Facebook has computed against all our actions to determine who we are as people, so that they can better advertise to us.
Automate the purging of your facebook data with CasperJS
At this point I should highlight that all code shown or demonstrated here, as well as hosted on GitHub (the repo will be linked at the bottom of this post), are proof of concept. These kinds of actions most certainly will be violating the terms of service that everyone most definitely fully read and agreed to willingly. This means that everything discussed here only advocates these actions, scripts and code snippets as proof of concept. You run the risk of violating the terms of service if you run this code against your own facebook account, so be warned.
The script that has been tested and released on github currently works as a method for editing a single post. Further iterations of the script will receive an array of facebook post ID numbers and iterate across multiple posts as such. You could also simply wrap the script in a shell or python script that wraps it in a for-loop to iterate across post IDs. Python would be more ideal due to the ability to thread and queue executions.
Below I’ll break down each section of the script with technical explanations.
How to use the script
What we want to do first is login to your facebook account obviously. The script currently has 4 user arguments passed to it :
–user
This is your username used when logging into facebook. Typically it would be your email address
–pass
This would be the password to login to facebook.
–postid
This is the “story_fbid” URL parameter passed when viewing a story. If you view a single post on facebook and look at the url bar, it should look something like this :
https://www.facebook.com/story.php?story_fbid=9999&id=8888In the above example, the postid would be “9999”
–userid
This can be grabbed in a more intelligent version of the script , but currently it needs to be passed as an argument. In the same URL example above, the userid field would be “8888”.
So a full example of the script would look like :
casperjs fbpurge.js --user="you@whatever.com" --pass='password' --postid='9999' --userid='8888'How to login to facebook with CasperJS
Logging into facebook with CasperJS is fairly easy and is already documented elsewhere.
/***************************************
* Login and authenticate with facebook *
***************************************/
casper.start().thenOpen(config['urls']['loginUrl'], function() {
    console.log(username);
    console.log("Facebook website opened");
});

casper.then(function(){
    this.evaluate(function(username, password){
        document.getElementById("email").value = username;
        document.getElementById("pass").value = password;
        document.querySelectorAll('input[type="submit"]')[0].click();
    },{
        username : username,
        password : password
    });
});
What we’re doing above is starting casper, then opening the URL stored in the config.json file (or you can hardcode it in the script, whichever works for you). Then we search for the email and password input boxes by the element ID, and enter the values and then hit the submit (or login) button. All of this is wrapped in an evaluate. Whats more important, after the above is filled in, we want to wait for about 10 seconds after hitting login just to make sure everything loads correctly :
casper.then(function(){
    this.waitForSelector("#pagelet_composer", function pass () {
        console.log("Logged In Successfully");
        this.capture('AfterLogin.png');
    }, function fail () {
        console.log("did not Log In");
        this.capture('login.png');
    }, 10000); // timeout limit in milliseconds
});
You can see that we are taking a screenshot after logging in in order to verify (for debugging) that we have in fact logged into our account.
How to edit a facebook post in CasperJS
First we want to go to the facebook post. If you view the script in its entirety you will notice that we login to the “Desktop” version of facebook, then when we move to the individual post we switch to the mobile view. This is because I found it much easier to navigate, debug and diagnose the trigger functions, clicks and mouse over selectors in the mobile version. For obvious reasons facebook simplifies the interface and it was much quicker to accomplish what we are looking for this way. You can most likely accomplish this in the desktop version of the site, it would just take more time to isolate all the selectors and elements and test.
/**************************
* Go to the facebook post *
**************************/
casper.thenOpen(thePost, function _waitAfterStart() {
    casper.wait(waitTime, function() {});
});

casper.waitForSelector('div[data-sigil="story-popup-causal-init"]', function _waitAfterClick() {
    this.click('div[data-sigil="story-popup-causal-init"] a[data-sigil="touchable"]');
},function(){
    this.echo('failed to click feed edit menu', 'INFO');
});

casper.then(function _waitAfterClick() {
    casper.wait(waitTime, function() {});
});
In the above snippet, we are waiting for a specific selector that will trigger that popup / dropdown menu when you click to edit a post. Since clicking that triggers an Ajax POST to pull down the dropdown options, we want to make sure its ready before clicking. One of the main things you want to take into account when working with CasperJS (and any headless browsing solution), is that you need to designate some time between certain actions to allow things to load and populate.
Once the selector is ready, we trigger a “click” on the button to bring the edit post link.
/*****************************
* Click edit button for post *
*****************************/
casper.waitForSelector('a[data-sigil="touchable touchable editPostButton dialog-link enabled_action"]', function _waitAfterClick() {
    this.click('a[data-sigil="touchable touchable editPostButton dialog-link enabled_action"]');
    casper.wait(waitTime, function() {});
},function(){
    this.echo('failed to click feed edit link', 'INFO');
});
Once we see that the edit link is populated with a few AJAX posts back to facebook (there are a lot of those throughout facebook), we specifically click the “Edit post” link and wait. The “waitTime” is a global variable that we use throughout the script. It makes it easy to designate a common wait time throughout in one spot. Currently it is set to about 4 seconds.
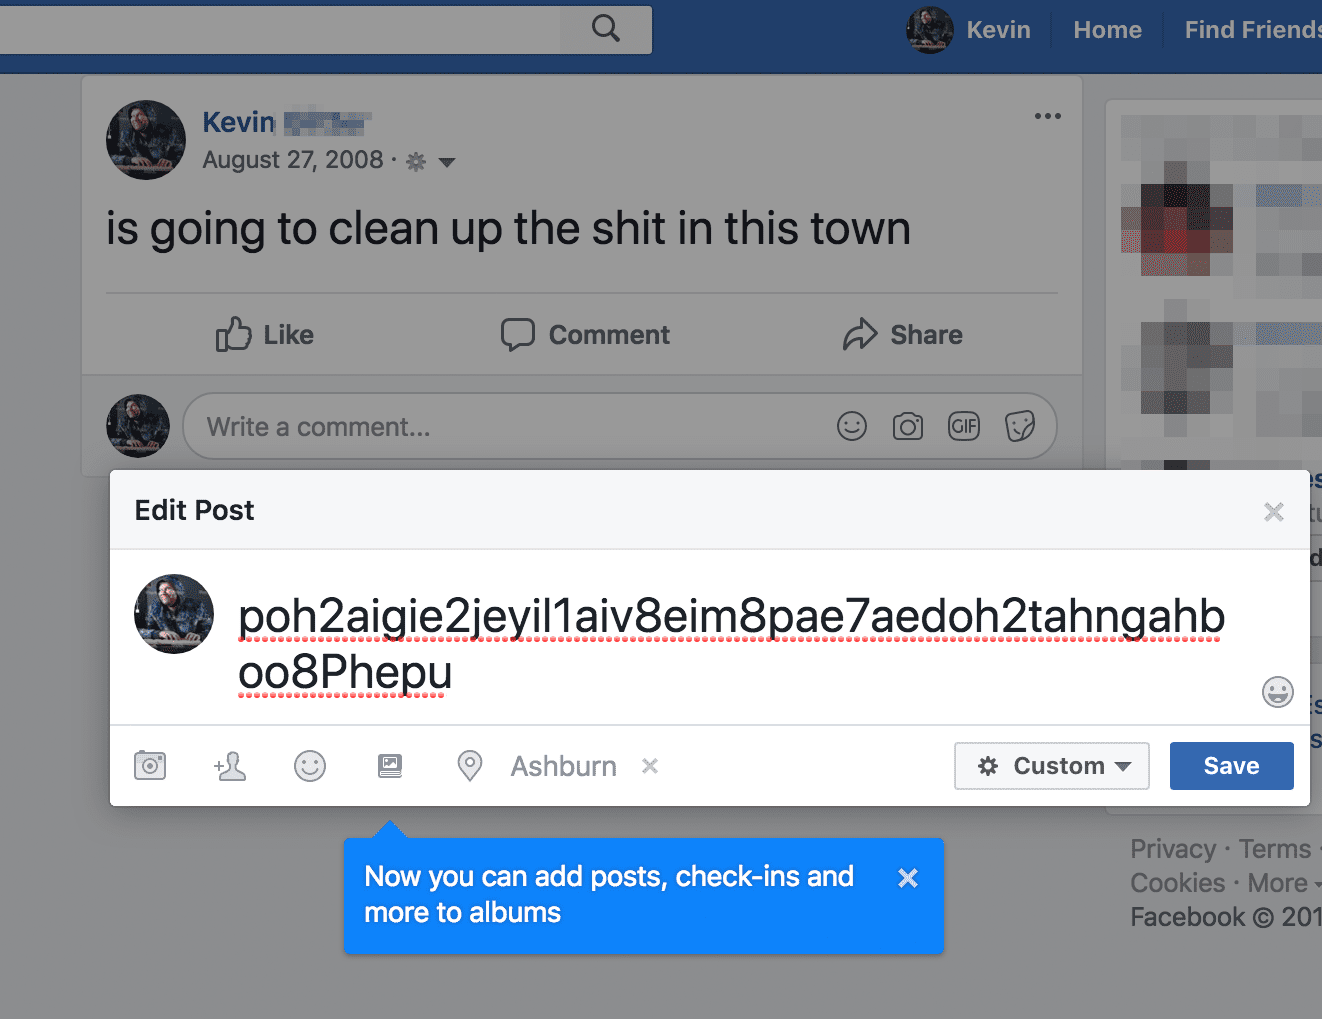
Next what we want to do once the edit post window pops up (its a modal window by the way, and is not a traditional HTML form), is replace the post text with randomly generated text. To generate the random text a function is used to just string random vowels and consonants together to make random nonsensical words. I wont post this function here but you can see it if you view it on github.
/**********************
* Change post content *
**********************/
casper.waitForSelector('form[data-sigil="m-edit-post-form"]', function _waitAfterClick() {
    this.evaluate(function () { jq = $.noConflict(true) } );
    console.log('Trying to edit and submit form : ' + random_post);
    this.mouse.move('textarea[data-sigil="m-edit-post-text-area m-textarea-input"]');
    this.mouse.click('textarea[data-sigil="m-edit-post-text-area m-textarea-input"]');
    this.evaluate(function(random_post) {
        $('textarea[data-sigil="m-edit-post-text-area m-textarea-input"]').text(random_post);
    }, random_post);
},function(){
    this.echo('failed to click feed edit link', 'INFO');
});
The above snippet took a bunch of tries to get it right. There is a bunch of ways to send text to forms and input areas with CasperJS. You could use sendkeys or set the document value of the selector. In our case we found success in moving the mouse around the text area of the post first, then click on the text area, then use a jQuery command to populate the text with the randomly generated words, saved in a variable called “random_post”.
/****************************
* Save changed post content *
*****************************/
casper.then(function _waitAfterClick() {
    this.mouse.move("#u_6_3");
    this.mouse.down("#u_6_3");
    this.mouse.up("#u_6_3");
    this.mouse.click("#u_6_3");
    var js = this.evaluate(function() {
        return document;
    });
    fs.write('results.html', this.getPageContent());
})
</pre.
This last part took a few days worth of trying. You would think clicking a button with CasperJS is simple, and for 99% of the time it is, when you are dealing with “traditional” html forms, or submit buttons and whatnot. With the facebook interface, it took many tries to get this to work, believe me.
What helped understand how the React based user interface worked, was thorough debugging and analysis of the mobile interface using Chrome’s Event listener breakpoints and running through the trigger functions for the entire process of clicking the “Save” button. Simply identifying the “Save” button’s selector and using this.click did not work. Trust me.
What I realize is that there may be more happening underneath the interface than can be easily analyzed from the surface by inspecting the elements and adding click breakpoints. The moment of realization came when I added mouse over, mouse down, mouse up, click and a few other mouse related breakpoints to see whats actually triggering when you click save.
To play it safe, I basically have CasperJS move the mouse around the Save button, press down, release and then click again. Most likely I dont need to do all that, but after 2 days of trying to click a button I thought the thorough approach was the safest. And it works!
If I had to guess why the script might not work for you I would suggest playing around and tweaking the following elements :
1. The wait time may need to be different based on many factors such as your network speed, speed of your workstation and a few other things I’m sure
2. The element names may be different! I have no idea how often these change. You can see up until clicking the “save” button, I am using mostly data attributes that feel like they wont change often. But they might.
3. I also noticed that element selector names may change simply by changing the user agent. This is entirely possible but I decided to not go down that rabbit hole as it would certainly cause me to go insane.
I hope this helps! Ultimately if the data you gave facebook is back into your own control, you can do whatever you want with it. I would recommend trying out this script and contribute to making it better if your interested!