Hello!
A few weeks ago we wrote a post that detailed how you could leverage PHP, Javascript and jQuery to detect facial features in images. In this post we will detail how you can take the detection of facial features and modify the image in real time with CSS and jQuery. You can read the original post by clicking here.
What we have decided to do is expand on the previous idea to allow the detection of a face in an image, and then subsequent image modifications using CSS and jQuery. The modifications via CSS can then be saved from the canvas. The saving of the image we will reserve for the 3rd part of this series of posts.
In the previous post, we used php and a php extension to detect a face, and additionally detect facial features like eyes, nose and mouth (if possible). This is accurate most of the time and is dependent on the Haar Cascades you are using and many other factors.
We thought it would be cool to detect a face and let you modify the image based on those detected regions! What you want to do first is decide how you want to modify the image. For simplicity reasons, we chose wonderful red blemishes. You need to declare the CSS of your “modifier” :
.redspot {
        left: -1000px;
        top: -1000px;
        z-index:10021;
        position: absolute;
        height:6px;
        width: 6px;
        opacity: 0.4;
        border-radius: 25px;
        background: #B40404;
}
The above CSS is a simple red dot with a degree of opacity that will make it not appear too solid and blend in nicely with whatever facial type is in the photo. So what we need to do next is (in our case) allow some level of user interaction to modify the image and generate these CSS “spots” over top of the image. If you remember from the first post we detected “areas” of the face and plotted them visually with CSS :
PHP
$path = realpath(dirname(__FILE__));
$total= face_count($path . '/file.jpg',$path . '/haarcascade_frontalface_alt.xml');
$face_coord = face_detect($path . '/file.jpg',$path . '/haarcascade_frontalface_alt.xml');
$eye_coord = face_detect($path . '/file.jpg',$path . '/haarcascade_mcs_eyepair_small.xml');
$mouth_coord = face_detect($path . '/file.jpg',$path . '/Mouth.xml');
$nose_coord = face_detect($path . '/file.jpg',$path . '/haarcascade_mcs_nose.xml');
CSS
.rect {
        border: 1px solid #a64ceb;
        opacity: 0.2; */
        left: -1000px;
        position: absolute;
        top: -1000px;
        z-index:10000;
    }
Javascript / jQuery
var rect = document.createElement('div');
                document.querySelector('.demo-container').appendChild(rect);
                rect.classList.add('rect');
                rect.id = 'rect'
                rect.style.width = " . $face_coord[0]['w'] . " + 'px';
                rect.style.height = " . $face_coord[0]['h'] . " + 'px';
                rect.style.left = (img.offsetLeft + " . $face_coord[0]['x'] . ") + 'px';
                rect.style.top = (img.offsetTop + " . $face_coord[0]['y'] . ") + 'px';";
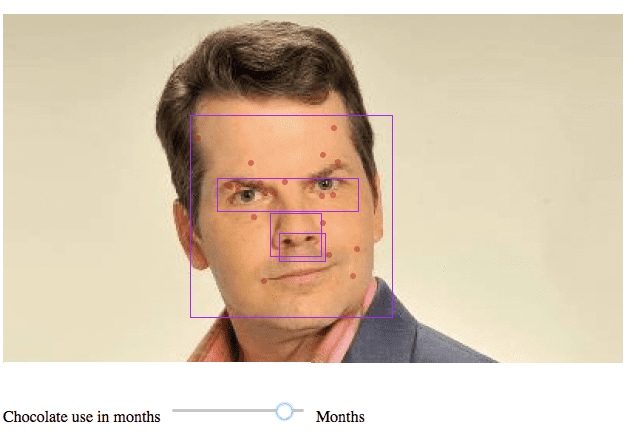
So what we will do is use jQuery + Javascript to take input from that slider you see in the image above, and apply that to generate varying degree’s of red spot intensity within the constraints of the detected face. This allows you to apply rough modifications to an image within facial regions for whatever reason. There could be several applications of this, but the key is being able to do it intelligently enough to by dynamic for whatever image you throw at the system.
What we have above is a simple HTML input element, specifically “range” or a slider. Every time the slider is adjusted, it triggers a function called outputSpot :
        function outputSpot(minmonth) {
                var spotRandom = Math.random() * (minmonth) + minmonth;

                //  Red spots for eyes and mouth
                if ($('.redspot').length ) {
                $(".redspot").remove();
                }
                for (i = 0; i < spotRandom; i++) {
                        placeRedSpot('recteye');
                        placeRedSpot('rect');
                }
        }
The function above is pretty straightforward. It takes the input from the range slider input element, and triggers yet another function based on some simple condition checks. The first line in the function takes the input range number (in this case # of months of chocolate use) and generates a random number range that is based on the number of months eating chocolate. The more months you eat chocolate, the higher the range will be. The number will always be random to give the element of an organic response.
The next if-statement removes the previously set spots every time the slider is changed. This allows a more "cleaner" feel (no pun intended). If you dont sanitize the input of the red spots at every slider adjustment, the layers will quickly overlap the image and become almost a solid color.
The last part of the above snippet triggers the final function which actually places the red spots on the image. The random number generated in the beginning is what determines how long this for-loop will run, which in turn dictates the actual number of spots generated.
        function placeRedSpot(divclass) {
                var divwidth = document.getElementById( divclass ).offsetWidth - 10;
                var divheight = document.getElementById( divclass ).offsetHeight - 10;
                var posx = (Math.random() * (divwidth - 10)).toFixed();
                var posy = (Math.random() * (divheight - 10)).toFixed();
                var redspot = document.createElement('div');
                document.querySelector( '.' + divclass ).appendChild(redspot);
                redspot.classList.add('redspot');
                redspot.id = 'redspot';
                redspot.style.position = "absolute";
                redspot.style.left = posx+'px';
                redspot.style.top = posy+'px';
        }
This function is the final part. It takes the class of the rectangle area that defines the detected facial region as input. What the first few lines of the function do is define a new region that is constrained to be a little smaller than the detected region. This is because, if you look at the top image, the rectangle that defines the face area (for example) actually overlaps the face because its a rectangle shape. If you didn't constrain the width of the "Red spot area" then you may have red spots appear outside of the facial region. This is a rough way of ensuring that you are more likely to have accurate results. Obviously accuracy is not guaranteed with this system, but we can make adjustments like this to ensure you are more likely to have an accurate result.
The next two lines generate a random position within that newly defined region to actually place the spot. You can see an X and Y position variable being defined. The next few lines use jQuery to modify existing classes and append the red spot class elements defined at the beginning of this post. The result is what you see in the image at the top of this post.
Pretty straightforward, right? In our next post we will detail a few more cool things you can do such as saving the modified version of the image and perhaps even bringing everything together into a mobile or web application to allow end-users to interact and modify facial images that they upload. Easy!


